Monday, January 30, 2012

Baked Bean & Corn Muffin Bites

Sweet corn bread.  Spicy baked beans.  Gooey cheese.  Baked Bean & Corn Muffin Bites!!
As you read yesterday, I am obsessed with small bites!  How can you not be?  They are the perfect party food:  easy to eat AND if you are trying to watch your waistline they are great for portion control! (That is -- if you can have just one!)
However prepping a bunch of miniature snacks for a crowd can be time consuming and the recipes can be involved.  So I decided to keep this one simple and semi-homemade!!  All you need is corn muffin mix, your favorite can of baked beans and shredded cheese.  That's it!!   
You end up with these cute little bites that would fit in at a swanky cocktail party as well as a Super Bowl spread!  


BAKED BEAN & CORN MUFFIN BITES
Makes 24 bites


Ingredients
  • Box of Jiffy Corn Muffin Mix
  • 1 egg
  • 1/3 cup milk
  • Can of favorite baked beans
  • Shredded Cheese
Directions
  1. Preheat oven to 400ºF.
  2. Using egg and milk, prepare Jiffy Corn Muffin Mix batter according to instructions on the box.  Let batter sit out for 10 minutes on the counter. (Tip: setting batter out makes sure the muffins get a nice crown.)
  3. Grease 24-mini muffin pan with non-stick cooking spray.  Divide the batter evenly between the muffin cups.  Bake for 12-14 minutes until tops are golden brown.  Set aside to cool in pan.
  4. In small saucepan, heat baked beans.
  5. Once muffins are cooled, using a melon baller or small spoon, scoop out the top of the muffin being careful not to break the sides.  Fill the hollowed muffin with 1 to 2 teaspoons of baked beans and then top with shredded cheese.  Serve warm or at room temperature.  Enjoy!

Sunday, January 29, 2012

Mini Pizza Bites

Happy Sunday!!  I don't know about you but I am in full-on Super Bowl preparation mode.  Joe and I are having a BUNCH of friends over to watch the game and I am already pumped!  I know, I know, the game is still a week away!  I just LOVE the Super Bowl!!  Not for the football game (I could care less about that)... for all of the bite-size food!  There is something about munching on things that are mini.  I can't quite explain it!  Whether it is mini-cupcakes, mini-burgers, mini-hot dogs... mini to me means YUMMY!!  Which would explain my recent obsession with Mini Pizza Bites!
SMALL bites are making a BIG emergence on party and wedding menus these days.  Peter Callahan, owner of Callahan Catering, says  miniaturized versions of our favorite comfort foods can be stylish and delicious.  Check out this slideshow of classic American dishes shrunk down into one-bite delights!  Don't you just want to pop them in your mouth right now??  I DO!!
Pizza is one of my favorite comfort foods.  BUT all of that gooey cheese, tangy sauce and chewy crust can be a mess to eat for party-goers.  So why not make a pizza snack that won't explode all over your shirt (AND my couch)!!  
These cheesy bites pack the same spicy punch of pepperoni pizza without the sauce stains.  AND another plus is you could sub in any of your favorite pizza toppings.  Instead of pepperoni and olives.... how about sausage and mushrooms?  Or go veggie with broccoli and peppers!  The pizza possibilities are endless!

MINI PIZZA BITES
 - Adapted from Plain Chicken -
 - Makes 24 bites - 


Ingredients
  • 3/4 cup flour
  • 3/4 teaspoon baking powder
  • 1/2 teaspoon garlic powder
  • 1/2 teaspoon Italian seasoning
  • 3/4 cup skim milk
  • 1 large egg
  • 1 cup shredded mozzarella cheese (I used low-fat, part skim)
  • 1/2 cup regular or turkey pepperoni slices, cut into quarters
  • 1/2 cup pitted kalamata olives, sliced
  • marinara sauce for dipping

Directions
  1. Preheat oven to 375ºF.
  2. In a large bowl, whisk together flour, baking powder, garlic powder and Italian seasoning.  In a small bowl, combine milk and egg then slowly whisk into flour mixture.  Stir in mozzarella, pepperoni and olives.  Let mixture rest for 10 minutes out on the counter.
  3. Meanwhile, spray a 24-mini muffin pan with non-stick cooking spray. Once mixture has rested, divide between the muffin cups and bake for 20 to 25 minutes, until bites are puffed and golden brown.
  4. Remove pizza bites from oven and allow to cool in the pan for 5 minutes.  Place some marinara sauce in a small bowl and heat in the microwave.  Serve with cooled pizza bites.  Enjoy!


Thursday, January 26, 2012

Scrambled Egg, Bacon, & Toast Cups

In the spirit of keeping things simple... I proclaim tonight BREAKFAST FOR DINNER -- with Scrambled Egg, Bacon, & Toast Cups!!  Why, you ask?  It has been a crazy couple of days!

My cousin Kyle, who has never been to Chicago, is visiting from Dallas.  Even though it's a nice, cool 30 degrees outside I have been dragging him all over town to see the sights.  I LOVE it when people come to visit!  Firstly, because I love to see my friends and family!  Secondly, because I love my new home!  Chicago is such a beautiful city you can't help but show it off.
Superdawg
Millenium Park & the "Bean"
Navy Pier


Drinks on the 96th Floor Signature Lounge of the Hancock Building
Wrigley Field
So back to breakfast!  I have been ogling some delicious looking egg cup recipes for weeks on Pinterest!  They look so simple to make and who can resist bacon, toast, and cheese??
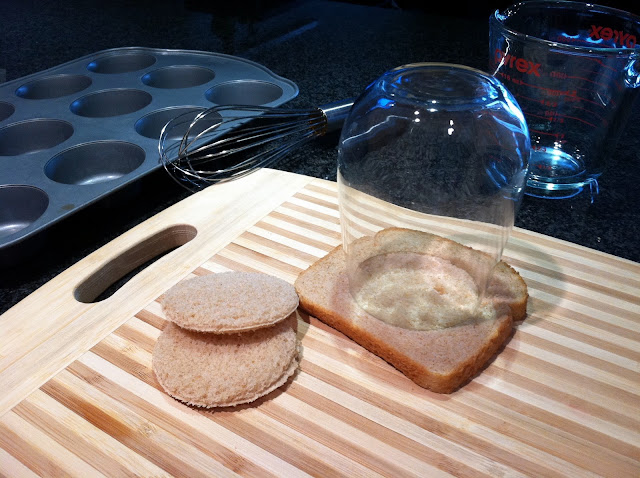
Wine glasses makes the best kitchen tools!

Eggs whipped together with veggies
MMMmmm... bacon!
A toasty crust surrounded by crispy bacon and topped with a perfectly baked egg.  Yes, yes, yes!!!  I can taste the buttery egg yolk now.  BUT that's the problem!  The egg yolk -  Joe hates runny egg yolks.  I know what you are thinking.  Is this a marriage deal breaker?  Can a runny-yolk gal be with a no-yolk guy?  Yes, it is possible!  You just have to make some concessions.  So SCRAMBLED it is!
((Swoon))


SCRAMBLED EGG, BACON, & TOAST CUPS
Adapted from Martha Stewart
Makes 6 egg cups

Ingredients
  • 6 large eggs
  • 6 slices of whole wheat bread (I used light bread)
  • 6 slices bacon
  • 2 tablespoons skim milk 
  • a few tablespoons of you favorite veggies, finely diced
  • grated low-fat cheese 
Directions 
  1. Preheat oven to 375ºF.
  2. In a large skillet, fry bacon over medium heat until partially cooked, about four minutes, flipping once.  Set aside to cool.
  3. Spray muffin cups with non-stick cooking spray.  Using a cookie cutter (or a wine glass, like me) cut out bread circles and place at the bottom of each muffin cup.  Take cooled bacon and wrap around the muffin cup, tucking into the bread circle.  Bake for 5 minutes to crisp.
  4. Meanwhile, beat together eggs, milk, diced veggies, salt & pepper.  Pour egg mixture into muffin cups, filling almost to the top.  Bake for 15 to 20 minutes or until centers are completely set.  Top egg cups with shredded cheese and bake for an additional 30 seconds to allow cheese to melt.
  5. Remove from oven and allow to cool for a few minutes before serving.  Run a knife around the edges to loosen cups.  Enjoy!

Tuesday, January 24, 2012

Lemony-Thyme Purple Potato Stacks

One way I like to brighten up after a long, dreary, cold winter day is to put a little color on my plate.  Lemony-Thyme Purple Potato Stacks fit the bill every time!  Thinly sliced potatoes are paired with bright lemon, earthy thyme and delicious olive oil -- then roasted until nice and crispy.  These delish darlings make the perfect side dish and are super easy to make! 
Lemony-Thyme Purple Potato Stacks ((Recipe Below!!))
I am not sure when I first stumbled upon the cute purple spuds but you can pretty much find them everywhere now. Known for their deep violet color, purple potatoes have been grown and harvested for more than 8,000 years in Peru, Bolivia and Ecuador.  That's a long time!  Specialty Produce says there are many varieties: Purple Viking, Purple Majesty, and the Purple Peruvian (which is the fingerling variety.) 
The stacks are a synch to make!  You just need a Mandoline, a muffin pan and five minutes prep time!

LEMONY-THYME PURPLE POTATO STACKS
Adapted from Seasaltwithfood
Serves: 4 to 6


Ingredients:
  • 4 medium purple potatoes (about 2 pounds), scrubbed
  • 1/4 cup olive oil
  • 1 tablespoon fresh thyme leaves
  • 1/4 cup fresh lemon juice
  • Kosher salt & fresh cracked pepper
Directions:
  • Preheat oven to 425ºF.
  • Spray a 12 cup muffin pan with non-stick cooking spray.
  • Keeping the skins on, thinly slice the potatoes until paper thin and place in a bowl.  Add in olive oil, lemon juice, and thyme leaves.  Season with salt and pepper.  Toss to combine making sure every slice is coated.
  • Stack slices on top of each other in muffin cups, pressing down to make them fit. (The slices may not fit perfectly -- it's okay -- just press them down more.)
  • Top with a sprinkling of salt and more thyme leaves.
  • Bake 30 to 35 minutes until the edges of the potatoes are crispy and the centers are fork tender.  Allow stacks to cool in pan for 2 to 3 minutes until serving warm.  Enjoy!

Friday, January 20, 2012

15 Minute Brussels Sprout Pesto


Calling all brussels sprout haters!!  You know who you are!  I don't understand all of the B.S. around brussels sprouts.  As one of my favorite vegetables I am still stunned when I hear my friends say "YUCK" when they see them.  So hate no more with Brussels Sprout Pesto -- and it only takes 15 minutes to cook!  You can't beat that!!
Brussels Sprout Pesto -- Recipe below!!
I cannot take credit for this fabulous idea!  One of my favorite blogs, Heather Cristo Cooks, featured a very similar recipe last week and I knew I had to make it!  
Look at those cuties!!
As a sprout enthusiast - I didn't see how you could go wrong.  Fresh brussels blanched to perfection then blitzed together with luscious olive oil, tart lemon, earthy nuts, tangy parmesan and a bite of fresh garlic.  I mean... HELLO!!
This recipe takes just 15 minutes!!
I veered from the original recipe a little subbing in walnuts, more oil and cheese and some red pepper flakes for more heat!
Walnuts and brussels are made for each other!!
Paired with some al dente pasta and this pesto is sure to please even the biggest brussels sprout hater!!
Brussely goodness!!
No brussels sprout haters can resist!!

15 MINUTE BRUSSELS SPROUT PESTO
Slightly adapted from Heather Cristo Cooks 
Serves 4

Ingredients
  • 1 pound Brussels sprouts
  • 5 garlic cloves
  • 1/2 cup plus a few tablespoons freshly grated parmesan cheese
  • 1/2 cup olive oil
  • 1/2 cup walnuts
  • juice of a lemon
  • 1 teaspoon crushed red pepper flakes
  • salt & pepper
  • 1 pound pasta
 Directions 
  • Bring large pot of salted water to a boiled.
  • Clean off brussels sprouts, remove outer leaves and cut in half.  Cook in boiling water until bright and tender, about 2 to 3 minutes.  Keeping the water boiling, remove brussels with a slotted spoon and rinse under cold water in a colander.  Set aside.
  • Put pasta into boiling water and cook using the box's directions.
  • Meanwhile, place garlic, brussels sprouts and olive oil into a food possessor.  Blend until smooth scraping down the sides.  Add in lemon juice, walnuts, parmesan and crushed red pepper flakes and blend until completely combined.  Add more oil if needed.  Salt and pepper to taste. 
  • Once pasta is cooked and drained toss with the pesto.  Serve topped with remaining parmesan.  Enjoy!

Mexican Hot Chocolate Chip Cookies

I am sooo cold.... sooo cold!  My hands are freezing.  My feet are freezing.  My nose is freezing.  CHICAGO IS FREEZING!!  My solution... Mexican Hot Chocolate Chip Cookies.  These bad boys are amazing right out of the oven.  Gooey centers... crispy edges... and a spicy bite that is sure to warm you up!!
BUT of course I have forgotten to bring my butter to room temperature!  WAIT? NO!!! I WANT THE COOKIES NOWDon't you hate it when this happens?
Cold butter.... what to do??
FORTUNATELY... I picked up a trick from someone a few years ago (for the life of me I can't remember who) on how to get your butter to room temperature in a minute... not an hour!
Love my new rolling pin!
Place your cold stick of butter between two sheets of wax paper/parchment paper.  
Getting warmer...
Take a rolling pin and start pounding.  Once you flatten the butter out quite a bit you can start rolling until the butter is about 1/4 inch thick.  
Room temperature butter in a minute!
VIOLA.... you have room temperature butter.  Move quickly though and peel off the butter before it gets too soft! (If it does... no worries... just use a spatula to get it off.)
Chocolatey goodness.....
Now, where were we??  OHHHH... the freezing cold and Mexican Hot Chocolate Chip Cookies!
Chipotle Cinnamon Sugar -- Spicy Savory Sweet
I used chipotle chili powder which can be really spicy.  So if you are concerned about the heat level then you can use regular chili powder or a combination of the two to get the spice just right!
I eat them straight out of the oven!!


MEXICAN HOT CHOCOLATE CHIP COOKIES
Slightly adapted from Martha Stewart/Everyday Food

Ingredients
  • 2 1/4 cups all-purpose flour
  • 1/2 cup unsweetened cocoa powder
  • 2 teaspoons cream of tartar
  • 1 teaspoon baking soda
  • 1/2 teaspoon coarse salt
  • 1 cup (2 sticks) unsalted butter, room temperature
  • 1 3/4 cups sugar
  • 2 large eggs
  • 1/2 cup semi-sweet chocolate morsels
  • 2 teaspoons cinnamon
  • 1 teaspoon chipotle chili powder (or regular chili powder if you want it less spicy)
Directions
  • Preheat oven to 400 degrees F.
  • In a bowl, sift together flour, cocoa powder, cream of tartar, baking soda and salt.  In another bowl, whip together butter and 1 1/2 cup sugar until creamy with an electric mixer.  Scrape down sides of the bowl and then beat in eggs.  Once combined slowly beat in flour mixture.   When dough is completely incorporated add in chocolate morsels and beat until combined.
  • In a small bowl, combine remaining 1/4 cup sugar, cinnamon and chili powder.  Using a tablespoon, form 1 inch balls of dough.  Roll dough balls in sugar mixture.  Place on parchment paper lined cookie sheets about 3 inches apart.  Bake cookies in batches for about 10 minutes, until cookies puff up and begin to crack.  Let cookies cool on wire racks.  Serve warm or completely cooled.  Enjoy!

Thursday, January 19, 2012

German Sunchoke Salad

I want to start off this blog with a disclaimer: EAT AT YOUR OWN RISK!
German Sunchoke Salad (my twist on German Potato Salad) - Recipe below!
Harsh... I know.... but read more and you will find that the sunchoke (also known as the jerusalem artichoke) is a ridiculously delicious tuber with some... ridiculously stinky side affects.
Sunchokes (or Jerusalem Artichokes)
The sunchoke is a tuber that resembles ginger root, has the texture of a potato and tastes very similar to an artichoke.  Eat the Seasons says the sunchoke plant is native to North America (specifically the Cape Cod area) and is closely related to the sunflower plant. ((Your random Jeopardy fact for the day!!))
I like to eat sunchokes with the skin on
Sunchokes are relatively inexpensive and are very healthy however they aren't widely used... because... to be frank... they make you fartA lot!  You see, sunchokes are very rich in inulin (a starching substance also found wheat, onions, bananas and asparagus.)  Inulin is great!  It helps with high cholesterol and triglycerides as well as weight-loss.  It can do this because it is never really absorbed in your stomach... it goes straight to your bowels where very important digestive bacteria LOVE it!  BUT... and this is a big but... in doing so the bacteria creates a lot of gas and well... you get the picture!
Roasted sunchokes are so good!
However, don't be scared of this tooting causing tuber!  It is so tasty and easy to prepare!!!  Just don't eat them on your wedding day, before you board an airplane or have a job interview!  While I usually puree sunchokes into a lucious soup or simply roast them with some olive oil, salt and pepper... I wanted to try something a little different.  
sliced sunchokes
My favorite whole grain mustard!
Mmmmm.... crispy bacon!
My fiance Joe loves German Potato Salad and so do I.  There is something about the tangy dressing, bacon (oh.... bacon) and onions that make my mouth water!  So I thought... why not do it with sunchokes instead!
Perfect with grilled steaks!

GERMAN SUNCHOKE SALAD
adapted from All Recipes
Ingredients
  • 1 pound sunchokes, scrubbed and cleaned
  • 4 slices bacon
  • 1 small onion, diced
  • 1/3 cup white vinegar
  • 1 tablespoon white sugar
  • 2 1/2 tablespoons whole grain mustard
  • 3 green onions, green and white parts thinly sliced
  • salt and pepper
  • 2 tablespoons olive oil
Directions
  • Preheat oven to 400 degrees F.
  • Leaving the skin on, slice sunchokes in 1/4 to 1/8 inch slices.  Toss with olive oil, a pinch of salt and pepper then back for 30 mins or until sunchokes are fork tender.
  • Meanwhile, slice bacon into thin strips.  Add bacon to a large skillet and cook over medium-high heat until crispy.  Remove bacon to a paper towel lined plate and set aside.  Discard all but 1 teaspoon of bacon grease in the pan.
  • Add onion to the pan and cook until browned.  In a small bowl, combine vinegar, sugar and mustard.  Season with salt and pepper to taste.  Once onions are ready add in the vinegar mixture, roasted sunchokes and half of the bacon.  Toss to combine.
  • Pour german sunchoke salad into a serving platter and top with remaining bacon and green onions.  Serve hot or warm.  Enjoy!

Wednesday, January 18, 2012

Chorizo Stuffed Mushrooms


Are you a fan of fungus?  I am!!  The edible kind I mean.  I could eat mushrooms on or with pretty much everything.... omelets, pizza, chicken, steak, stir-try... you name it!
Chorizo Stuffed Mushrooms ((Recipe below!!))
My affinity for fungi started when I moved to mushroom country when I was a kid! (My parents still live there!)  Where is the land of mushrooms, you ask?  Why.... Kennett Square, PA!  Yes I grew up in the Mushroom Capital of the World!  So move aside Candy Capital of the World (Chicago, IL) and Slurpee Capital of the World (Winnepeg, MB)! 
Kennett Square, PA via shelpucix

Kennett Square is an historic town in Southeastern Pennsylvania.  This place has roots!!  Soldiers marched through the area towards the Battle of the Brandywine during the American Revolution and its residents played a vital role in the Underground Railroad.  So where do mushrooms fit in?  
via nj.com
According to mushroom scholar Samuel E. Flammini, back in the 1890's two Quaker farmers imported the "schrooms" from Europe as a way to make extra cash in their carnation growing business.  Carnations are grown in elevated beds which left a bunch of space underneath to grow mushrooms.  
Kennett Square Mushroom Festival via Philly Homegrown
What started as a sideline business has now spawned into a multimillion dollar industry for Kennett Square and the surrounding towns.  It also gives the area a certain aroma ((if you will))... since mushrooms are grown in "you-know-what!"  You guys know what I am talking about! And NO... you don't get used to the smell!
Mushrooms from Kennett - Thank you Lincoln Park Whole Foods!
Last week, I found some Kennett Square mushrooms at the Lincoln Park Whole Foods and knew they were destined for my belly!!  Since I was already planning to make delish Chicken Mole Tacos I decided to stuff the cute little buttons with Chorizo and Manchego cheese.  YUMM!!!  To kick the recipe up even further... I brushed some tasty tequila on the mushrooms before filling them.  It gave the schrooms a slightly sweet undertone which pairs nicely with the spicy sausage and nutty cheese. DELICIOSO!!!
Melt in your mouth yummy!!

CHORIZO STUFFED MUSHROOMS
slightly adapted from Daisy Martinez/Food Network


Ingredients
  • 1 4-ounce Chorizo sausage, raw with casing removed
  • 16 large white mushrooms
  • 4-ounces tequila
  • 3 green onions, both green and white parts thinly sliced
  • 1/2 cup plus 2 tablespoons bread crumbs
  • 1/4 cup reduced-sodium chicken stock
  • 2 tablespoons cilantro
  • 1/3 cup plus 2 tablespoons coarsely grated Manchego cheese

Directions
  • Preheat oven to 400 degrees F.
  • Remove stems from mushrooms.  Mince half of the stems and set aside.  Place mushroom caps into a shallow baking dish and brush with tequila.
  • Heat large skillet over medium-high heat and add chorizo.  Using a wooden spoon break up sausage into crumbles while it cooks through about 5 minutes.  Remove chorizo to a plate lined with a paper towel and discard all but 1 teaspoon of sausage fat from pan.
  • Reheat skillet and add in mushroom stems.  Cook until soft about 2 to 3 minutes.  Add in 1/2 cup breadcrumbs and stir until toasted.  Remove pan from heat.  Stir in chorizo, 1/3 cup cheese, cilantro and green onions.  Add in chicken stock until mixture is moist but not runny.  
  • Spoon mixture into mushroom caps.  Top with remaining bread crumbs and cheese.  Bake until stuffing is lightly browned, about 20 to 25 minutes.  Enjoy!